Panning is the technique of moving your camera with a moving subject so the subject stays relatively sharp while the background turns into motion blur. The cleaner your movement and horizon control, the more intentional the photo looks.
That same smooth tracking becomes easier to see when panning autumn leaves, where color and motion make small changes in movement more visible.
Quick verdict: For better panning photos, use a slower shutter speed, track your subject smoothly before and after pressing the shutter, keep your feet stable, and use a clear horizon or background line to avoid tilted, distracting frames. Start around 1/30 to 1/125 second depending on subject speed, use continuous autofocus and burst mode, then adjust after reviewing sharpness and motion blur.
The goal is not to make every part of the subject tack sharp. A strong panning photo usually has one clear anchor point—such as a face, helmet, logo, wheel area, or eye—combined with a streaked background that shows speed. Horizon control matters because a slightly tilted frame can make the blur look accidental, even when your timing is good.
Quick Setup: Camera Settings for Panning and Level Horizons
Panning works best when your camera settings support motion rather than fight it. The main setting is shutter speed. Too fast, and the background freezes. Too slow, and the whole subject may smear beyond recognition. Your starting point depends on subject speed, distance, lens length, and how smooth your movement is.
Use Shutter Priority mode if you want the camera to handle aperture automatically, or Manual mode if the light is consistent and you want exposure to stay stable throughout the pan. Set autofocus to continuous AF—often called AF-C, AI Servo, or continuous tracking—so the camera keeps adjusting focus as the subject moves.
Burst shooting is helpful because tiny changes in your movement can make one frame sharper than the next. However, burst mode does not replace technique. You still need to begin tracking before the shot, press the shutter gently, and continue the motion afterward.
Aperture is secondary, but it still matters. If your aperture is very wide, depth of field may be thin, making it harder to keep enough of the subject sharp. If your aperture is very narrow, you may need a higher ISO in low light. Start with a low-to-medium ISO when light allows, and let the aperture fall where it gives you a correct exposure and usable depth of field.
If your lens or camera has image stabilization, look for a panning mode. Some systems call this Mode 2 or active panning stabilization. It corrects vertical shake while allowing horizontal movement. If your stabilization system does not handle panning well, test it both on and off.
| Subject type | Starting shutter speed | AF mode | Stabilization note | Horizon tip |
|---|---|---|---|---|
| Walking person | 1/15 to 1/30 sec | Continuous AF or single point tracking | Stabilization can help if movement is slow | Use sidewalks, building edges, or a shoreline as a reference |
| Runner or dog | 1/30 to 1/60 sec | Continuous AF with tracking area | Panning mode if available | Keep camera height steady through the sweep |
| Cyclist | 1/30 to 1/60 sec | Continuous AF, small zone or tracking | Panning mode often helps | Align with road edge, path, fence, or track boundary |
| Car or motorcycle | 1/60 to 1/125 sec | Continuous AF with subject tracking if reliable | Test panning mode at your focal length | Level the road edge or distant horizon before the vehicle arrives |
| Bird or wildlife moving sideways | 1/60 to 1/125 sec, sometimes faster | Continuous AF with tracking | Stabilization useful with longer lenses | Use waterline, tree line, or background bands as a guide |
| Very fast subject | 1/125 sec or faster to start | Continuous AF, burst mode | Test both on and off | Leave extra room for later straightening |
Treat these as starting points, not fixed rules. A cyclist close to you may need a faster shutter than a cyclist farther away. A long lens magnifies shake and can make panning harder. A plain background may show little blur even when your technique is good, while a textured fence, tree line, crowd, or city street can make the motion effect obvious.
What You Need Before You Start
You do not need specialist equipment to learn panning, but a few basics make practice easier.
Useful gear includes:
- A camera with manual or shutter priority control
- A zoom or telephoto lens, such as a 70-200mm or similar range
- A comfortable camera strap
- A charged battery
- A fast enough memory card for short bursts
- An optional monopod for heavier lenses
A phone can also be used for practice if it offers shutter control, a motion mode, or a manual camera app. A dedicated camera usually gives you better control over shutter speed, autofocus, burst shooting, and lens choice, but the core movement—tracking smoothly with the subject—is the same.
Choose a location where motion is predictable. Good options include bike paths, roadsides from a safe public area, sports fields, beaches, parks, skate areas, or train platforms where photography is permitted. Look for subjects moving across your field of view rather than straight toward you.
Safety and courtesy matter. Do not step into traffic, block a bike lane, distract drivers, interfere with athletes, trespass, or approach wildlife too closely. A safe side-on viewpoint is better than a dramatic position that puts you or someone else at risk.
Backgrounds are important. A completely blank wall or open sky will not show much blur. A cluttered background may distract from the subject. Ideal backgrounds have texture—trees, railings, signs, spectators, buildings, fences, waves, or track markings—without overwhelming the frame.
Before the subject arrives, identify your horizon aids. These can include:
- Viewfinder gridlines
- An electronic level
- Road edges
- Shorelines
- Fences
- Track boundaries
- Building verticals
- Distant tree lines
You do not need a perfect natural horizon in every shot. You need a deliberate reference that helps the frame feel controlled.
Step-by-Step Panning Technique
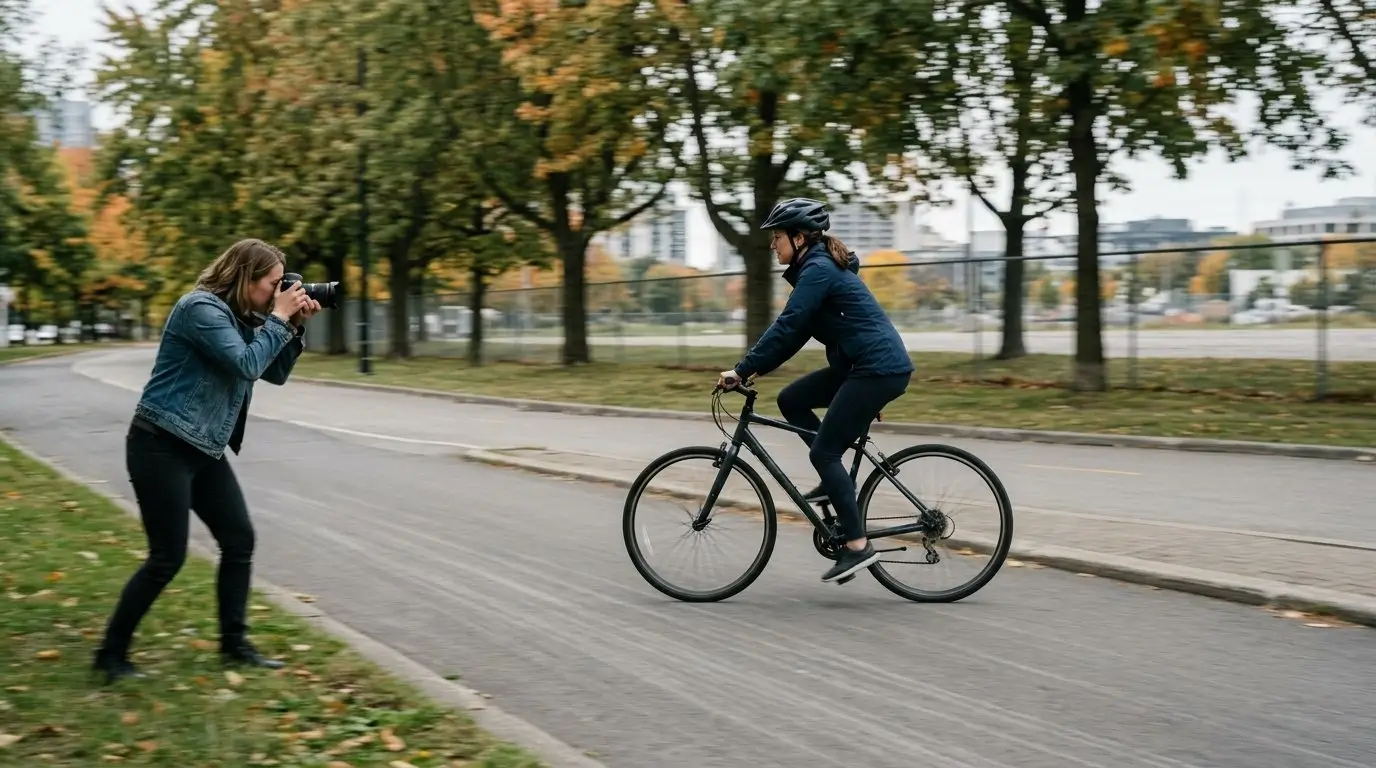
1. Choose a subject moving across your field of view
Start with a subject moving sideways, not directly toward or away from you. Cyclists, runners, cars, dogs, skaters, and birds flying parallel to you are good choices.
Side-on motion is easier because the subject stays at a more consistent distance, and the background blur moves in a clear direction. Subjects coming straight toward you require stronger autofocus performance and do not create the same streaked background effect.
2. Set your stance before the subject arrives
Stand with your feet about shoulder-width apart. Point your body toward the place where you expect to finish the pan, then twist your upper body back toward the starting point.
This matters because the end of the pan is where many photographers lock up or run out of rotation. If your body is already facing the finish, you can unwind smoothly as the subject passes through the frame.
Keep your knees relaxed and your weight balanced. Avoid leaning forward or rocking from foot to foot.
3. Pre-frame the subject’s path
Before shooting, imagine the line your subject will follow. Decide where you want the subject to enter the frame, where you will press the shutter, and where you will finish the follow-through.
Leave space in front of the subject. This is called lead room, and it gives the moving subject somewhere to “go” inside the image. A cyclist or car placed too close to the front edge of the frame often feels cramped, even if the blur is successful.
Also check the background. If there is a pole, sign, or bright patch that will intersect the subject, adjust your position before the action happens.
4. Begin focusing and tracking early
Do not wait until the subject is perfectly in front of you. Half-press the shutter or use back-button focus early, then track the subject smoothly as it approaches your chosen shooting point.
Use continuous autofocus. If your camera has subject tracking, try it, but do not rely on automation alone. For predictable movement, a small zone or single point placed over the subject can work well. For erratic subjects, a wider tracking area may be easier.
The important part is to start tracking before you shoot. This gives your body, your eye, and your autofocus system time to settle into the same motion.
5. Rotate from your waist or hips
A common mistake is moving only your arms. That often creates a jerky pan and changes the camera height during the exposure.
Instead, hold the camera securely, tuck your elbows slightly, and rotate from your torso. Your arms should guide the camera, but your body should create the main sweep. Keep the camera at a consistent height and try to keep your horizon reference in the same part of the frame.
If you are using a longer lens, support it with your left hand under the lens barrel and keep your grip relaxed. Tension makes the movement less fluid.
6. Press the shutter gently while continuing the motion
When the subject reaches your chosen position, press the shutter without stabbing at the button. A sudden jab can dip the camera and blur the subject.
Keep moving as you press. The exposure happens during your motion, not after it. If you stop at the exact moment you press the shutter, the subject will continue moving while the camera does not, and the subject may become completely blurred.
Short bursts can help. Try three to five frames as the subject passes the best part of the background. Avoid holding the shutter for too long, or you may stop thinking about timing and composition.
7. Follow through after the shot
Continue the pan after the shutter fires, just like following through in a golf swing, tennis stroke, or baseball swing. Your movement should start before the exposure and end after it.
Follow-through is one of the biggest differences between a random blurry photo and a controlled panning shot. It keeps the subject’s motion and your camera motion aligned for longer.
8. Review and adjust in small increments
After a short set, review your results. Do not judge only from the rear screen at full image view. Zoom in to check whether the subject has a sharp anchor point, then zoom out to see if the overall motion effect works.
If the subject is too blurry, use a slightly faster shutter speed, such as moving from 1/30 to 1/60. If the background is too static, slow the shutter down, such as moving from 1/125 to 1/60.
Change one thing at a time. If you adjust shutter speed, autofocus area, stance, focal length, and background all at once, it becomes difficult to know what improved the shot.
A successful panning photo usually has:
- Recognizable subject detail
- A streaked background
- A clear sense of direction
- A level or deliberately angled horizon
- Enough space in front of the subject
- Motion blur that feels intentional rather than accidental
Horizon Tips That Make Panning Photos Look Intentional
Horizons matter because panning already introduces blur and movement. If the horizon is only slightly tilted, viewers may read the whole image as careless rather than energetic. A level frame gives the motion blur structure.
The easiest fix is to enable gridlines or an electronic level before the subject arrives. Do not try to solve every alignment problem while the subject is passing. Your attention should be on tracking smoothly. Use your setup time to decide what “level” means in that scene.
Choose one reference line. It might be:
- The true horizon
- A road edge
- A fence
- A wall
- A shoreline
- A running track boundary
- A row of windows
- Building verticals
Avoid switching references mid-pan. If you start by leveling against the road edge and then react to a tilted roofline, your camera may drift.
Keep your camera height consistent throughout the movement. Rising or dipping during the pan can make the background smear diagonally or make the horizon feel unstable. This is another reason to rotate from your torso instead of lifting with your arms.
Slopes need a decision. If a cyclist is climbing a hill, leveling the actual horizon may make the road look naturally sloped. But if you level the road instead, the whole scene may look tilted. Neither choice is automatically wrong. Decide whether the slope is part of the story. If it is, preserve it. If it distracts from the subject, compose around a different reference.
A Dutch angle can work in panning, especially with motorsports, skating, or fast action, but it needs to look deliberate. A strong diagonal can add energy. A tiny accidental tilt usually just looks like a mistake. If you want an angled frame, commit to it clearly.
Leave extra room around the subject when you shoot. Minor straightening in editing can crop the edges of the frame. If the subject’s wheels, feet, wings, or lead room are already close to the border, straightening may cut off important parts.
Post-processing can help, but it should not be your entire horizon strategy. Heavy straightening can remove the space that made the composition work. It can also make a carefully timed frame feel cramped. Better horizon control in-camera gives you more editing flexibility later.
Common Mistakes and How to Fix Them
The subject is completely blurry
If nothing on the subject is recognizable, your shutter speed may be too slow for your current skill, subject speed, or lens length. Increase the shutter speed one step and try again. For example, move from 1/30 to 1/60.
Also check your follow-through. If you stop when pressing the shutter, the subject will smear. Start tracking earlier, keep moving through the exposure, and continue after the shot.
Continuous autofocus can help if the subject distance changes. If the subject moves unpredictably, choose a simpler subject first, such as cyclists on a path or cars moving at a steady speed.
The background is not blurred enough
If the subject is sharp but the background looks frozen, your shutter speed is probably too fast for the effect you want. Slow it down gradually.
You can also use a longer focal length, position yourself where the subject passes closer to you, or choose a more textured background. A plain sky or empty wall will not show much motion blur no matter how well you pan.
Do not jump immediately to extremely slow shutter speeds. It is better to get consistent results at 1/60 or 1/125 before trying 1/15.
The horizon is tilted
Enable gridlines or an electronic level. Before the subject arrives, practice the sweep without shooting and watch whether your reference line rises or falls in the frame.
Reset your stance. Point your body toward the end of the pan, twist back, and rotate smoothly through the subject’s path. If your feet are aimed at the starting point, you may twist awkwardly and tilt as you finish.
Also check whether you are lifting with your arms. Keep elbows slightly tucked and rotate from the torso to maintain height.
The subject is too small or awkwardly placed
Pre-compose the path. Decide where the subject should be at the moment you press the shutter. Leave lead room in the direction of movement and avoid placing the subject too close to the frame edge.
If the subject is too small, use a longer focal length or choose a safer position closer to the path. Do not compromise safety for framing. It is better to crop slightly than to stand somewhere dangerous.
Focus locks on the background
If the camera keeps grabbing the background, adjust your autofocus setup. Use continuous AF with a smaller focus area, place the focus point over a high-contrast part of the subject, or try subject tracking if your camera handles that subject well.
Back-button focus can help separate focusing from shutter release, especially when you want to begin tracking early. Another option is pre-focusing on a spot the subject will cross, then timing the pan as the subject reaches that area.
Your movement looks jerky
Relax your grip. A tense grip often causes small jumps in the pan. Tuck your elbows slightly, support the lens, and rotate from your hips or waist.
Practice without taking photos. Pick a passing car, cyclist, or runner and follow them smoothly through the viewfinder. Keep the horizon reference stable. Once the movement feels fluid, start shooting again.
Exposure changes during the pan
If the light changes across the background—such as moving from shade to bright pavement—your camera may alter exposure mid-burst in an automatic mode. In consistent light, manual exposure can keep the frames uniform. Exposure lock can also help when appropriate.
Check that highlights are not clipping badly and shadows are not blocking up more than you can accept. Panning is already visually busy, so strong exposure shifts can distract from the motion.
Practice Plan, Result Check, and Editing Tips
A short, focused practice session is more useful than random shooting. Try this 20- to 30-minute routine.
Pick one location, one subject type, and one focal length. For example, stand beside a bike path with a 70mm lens and photograph cyclists moving left to right. Keep your background consistent so you can judge your changes.
Shoot three sets:
- Safe speed: Start around 1/125 for cars or 1/60 for cyclists.
- Moderate blur: Slow down one stop, such as 1/60 to 1/30.
- More motion: Slow down again only if your subject still has recognizable detail.
After each set, review the results. At 100% view, look for at least one sharp anchor point. This might be a face, helmet, logo, number plate, wheel area, or animal eye. Then zoom out and judge the image as a whole.
Use this result check:
- Does the subject have at least one sharp anchor point?
- Does the background blur follow the direction of motion?
- Does the horizon feel level or intentionally angled?
- Is there enough lead room in front of the subject?
- Does the subject stand out from the background?
- Does the motion feel deliberate?
If the answer is mostly yes, the panning shot is working. It does not need to be perfectly sharp from front to back. In fact, some blur on moving parts such as wheels, legs, or wings can strengthen the sense of motion.
Editing should be simple. Crop to improve lead room and remove distractions. Straighten modestly if the horizon is slightly off. Adjust contrast, color, and clarity carefully. Too much sharpening or clarity can make motion blur look crunchy and unnatural.
Do not be discouraged if many frames fail. Panning often has a lower keeper rate than static photography, especially at slower shutter speeds. The goal is to build a repeatable movement. Once you can consistently track one subject type, try faster subjects, longer lenses, tighter framing, or more complex backgrounds.
FAQ
What shutter speed should I use for panning photography?
Start around 1/30 to 1/60 for cyclists, 1/60 to 1/125 for cars, and 1/15 to 1/30 for walking people. Use these as starting points, then adjust based on subject speed, distance, lens length, and how much blur you want.
How do I keep the horizon straight while panning?
Enable gridlines or an electronic level, choose one reference line, and set your stance before the subject arrives. Rotate from your torso instead of lifting with your arms. Practice a level sweep without shooting to see whether your frame rises, dips, or tilts.
Should image stabilization be on or off for panning?
Use a panning stabilization mode if your camera or lens has one. It usually allows horizontal movement while reducing unwanted shake. If your system does not have a panning mode, test stabilization on and off to see which gives smoother results with your lens.
Why is my subject blurry when I pan?
Your shutter speed may be too slow, your movement may be jerky, or your autofocus may not be tracking the subject. Try a slightly faster shutter speed, begin tracking earlier, use continuous AF, and keep moving after pressing the shutter.
Can I practice panning with a phone camera?
Yes, especially if your phone has shutter control, burst shooting, or a motion mode. A camera gives more control, but you can still practice the most important skill: following a moving subject smoothly while keeping the frame level.
Is a tilted horizon ever acceptable in a panning shot?
Yes, but it should look intentional. A strong Dutch angle can add energy to action photos. A small accidental tilt usually weakens the image. If you angle the horizon, make it deliberate and leave enough room to crop if needed.