
Lighting changes the mood, shape, color, and clarity of every photograph. The good news is that you do not need a studio full of equipment to start using light well. You need to recognize what kind of light is in front of you and decide whether to use it, move your subject, or modify it.
These 9 lighting types cover the most useful options for beginners: natural light, golden hour, blue hour, hard light, soft light, front light, side light, backlight, and artificial light. Some describe the source of the light, some describe its quality, and some describe its direction. Learn to combine them, and your photos will improve faster than if you only upgrade your camera.
Why Lighting Matters More Than Gear
A better camera can capture more detail, but light decides whether that detail looks interesting. Flat, dull light can make an expensive camera produce boring images. Strong, thoughtful light can make a phone photo feel intentional.
Lighting affects three things immediately: exposure, mood, and shape. Exposure controls how bright the image is. Mood comes from color, contrast, and shadow. Shape comes from the way light reveals edges, texture, and depth.
This is why experienced photographers often move before they change settings. They turn a subject toward a window, wait for the sun to drop, or shift a product closer to a reflector. Learning light gives you control in any location, with any camera.
A Simple Mental Model for Reading Light

Before choosing a lighting type, ask four questions.
First, where is the light coming from: front, side, behind, above, or below? Direction controls shadows and depth.
Second, is the light hard or soft? Hard light creates crisp shadow edges. Soft light creates gentle transitions and is usually more flattering.
Third, what color is the light? Color temperature means whether light appears warm, neutral, or cool. Sunset is warm; shade and twilight often look cool.
Fourth, how bright is the light compared with the shadows? This contrast decides whether the photo feels dramatic or calm.
If you can answer those four questions, you can read almost any scene and make a better lighting choice.
1. Natural Light
Natural light is any light from the sun, whether direct, reflected, or filtered through clouds, windows, trees, or curtains. It is the easiest lighting type to practice because it is free and always changing.
Its look depends on weather and direction. Window light can be soft and flattering for portraits, food, or still life photos. Direct midday sun can be harsh and contrasty.
To use natural light well, move your subject instead of accepting the first position. Place food near a window, photograph flowers in open shade, or turn a person slightly toward the brightest area. A common mistake is assuming natural light means “no control.” You can still shape it by changing angle, distance, and background.
2. Golden Hour Light
Golden hour happens shortly after sunrise and shortly before sunset, when the sun is low and warm. This light creates long shadows, glowing edges, and rich color, making it popular for portraits, landscapes, travel, and nature photography.
Because the light comes from a low angle, it adds dimension without the harsh overhead shadows of midday sun. Try placing your subject with the sun at a 45-degree angle for warm highlights and soft depth.
Watch your exposure, especially if the sun is in the frame. A common mistake is overexposing the sky or letting faces become too orange. Adjust your angle or use a little fill light, which means adding light to reduce shadow darkness.
3. Blue Hour Light
Blue hour is the short period before sunrise or after sunset when the sky turns deep blue. The light is cool, even, and atmospheric. It works especially well for city scenes, architecture, street photography, and landscapes with artificial lights.
The magic of blue hour is balance. The sky is dark enough for lamps, signs, and windows to glow, but not so black that the background disappears.
Use a tripod or stable surface if your shutter speed becomes slow. Look for reflections in water, glass, or wet streets to add depth. A common mistake is waiting too long. Once the sky turns fully black, you lose the soft blue color that makes this lighting type special.
4. Hard Light
Hard light comes from a small or distant light source, such as direct sun, a bare flash, or a small lamp. It creates sharp, defined shadows and strong contrast.
Beginners often avoid hard light, but it can be powerful when used intentionally. It suits street photography, sports, bold fashion, architecture, and black-and-white images where shadow shapes matter.
Try using hard light to create patterns from blinds, fences, leaves, or building edges. Position your subject so the shadows fall in a deliberate way. The common mistake is letting hard light hit faces from overhead at midday, causing dark eye sockets and shiny highlights. If it looks unflattering, change the angle or move into open shade.
5. Soft Light
Soft light comes from a large light source or light that has been diffused, meaning spread out. Cloudy skies, shaded windows, curtains, softboxes, and reflected light all create soft light.
This is one of the most forgiving lighting types. It reduces harsh shadows, smooths skin texture, and makes products, food, pets, and newborn photos look gentle and clean.
To find soft light outdoors, look for open shade near a bright area, such as under a porch facing the sky. Indoors, place your subject close to a window with a sheer curtain. A common mistake is making soft light too flat. Add depth by turning the subject slightly away from the light or using a darker background.
6. Front Light
Front light means the light comes from behind the camera and shines onto the front of the subject. It is simple, clear, and easy to expose because shadows fall behind the subject.
This lighting direction works well for snapshots, wildlife identification, colorful murals, and scenes where you want detail across the frame. It can also make colors appear bright and even.
The drawback is that front light can look flat because it hides texture and shape. To improve it, shoot when the light is lower, not directly overhead, or move slightly to one side so small shadows appear. A common mistake is using on-camera flash straight at a subject and creating a harsh, washed-out look.
7. Side Light
Side light comes from the left or right of the subject. It creates visible shadows, which reveal form, texture, and depth. If front light explains a subject clearly, side light makes it feel three-dimensional.
Use side light for landscapes with hills, portraits with character, product photos with texture, or food images where shape matters. A loaf of bread, a wooden table, or a mountain ridge can all look better with side light.
Place your subject near a window and rotate it until the shadow side still has detail. If the contrast is too strong, use a reflector, white card, or nearby wall to bounce light back. A common mistake is letting the shadow side become completely black unless that drama is intentional.
8. Backlight
Backlight happens when the main light source is behind the subject and points toward the camera. It can create glow, separation, rim light, or silhouettes. Rim light is a bright outline along the edge of a subject.
Backlight is excellent for hair, leaves, smoke, glass, and atmospheric scenes. It can make ordinary subjects feel cinematic because the edges catch light while the front stays darker.
Expose carefully. If you want detail on the subject, tap or meter for the subject and let the background become brighter. If you want a silhouette, expose for the sky or bright background. A common mistake is ignoring lens flare. Use a lens hood, shade the lens with your hand, or shift slightly.
9. Artificial Light
Artificial light includes flash, LED panels, lamps, continuous studio lights, phone lights, and practical lights already in a scene. Its biggest advantage is control: you can choose direction, brightness, color, and distance.
Start simple. Use one light and learn how it changes as you move it closer, farther, higher, lower, or to the side. A desk lamp can teach the same basic ideas as a studio light.
Artificial light is useful for portraits, products, macro photos, videos, and indoor scenes where natural light is weak. Watch for mixed color temperatures, such as a warm lamp and cool window light in the same photo. A common mistake is using too many lights too soon. Master one light before adding another.
How to Choose the Right Lighting Type for Your Photo
Choose lighting based on the subject and the feeling you want.
For gentle portraits, food, and clean product photos, start with soft natural window light. For dramatic texture, use side light or hard light. For outdoor portraits and landscapes with warmth, choose golden hour. For city scenes and mood, try blue hour. For shape and separation, experiment with backlight.
Also consider how much control you need. If timing and weather are flexible, natural light may be enough. If you need repeatable results, artificial light is better. The right lighting type is not always the prettiest one; it is the one that supports the story, texture, and mood of the photo.
Beginner Lighting Mistakes to Avoid
The first mistake is standing still. Small movements can completely change shadows, glare, and background brightness. Walk around the subject before deciding.
The second mistake is ignoring the background. A well-lit subject can still fail if the background is too bright, messy, or distracting.
The third mistake is mixing light colors without noticing. Warm indoor bulbs and cool window light can make skin or products look strange.
The fourth mistake is fixing everything with camera settings. Settings adjust exposure, but they do not improve bad light direction. Move the subject, block light, bounce light, or wait for better light before relying on editing.
Simple Practice Plan: Learn One Lighting Type at a Time
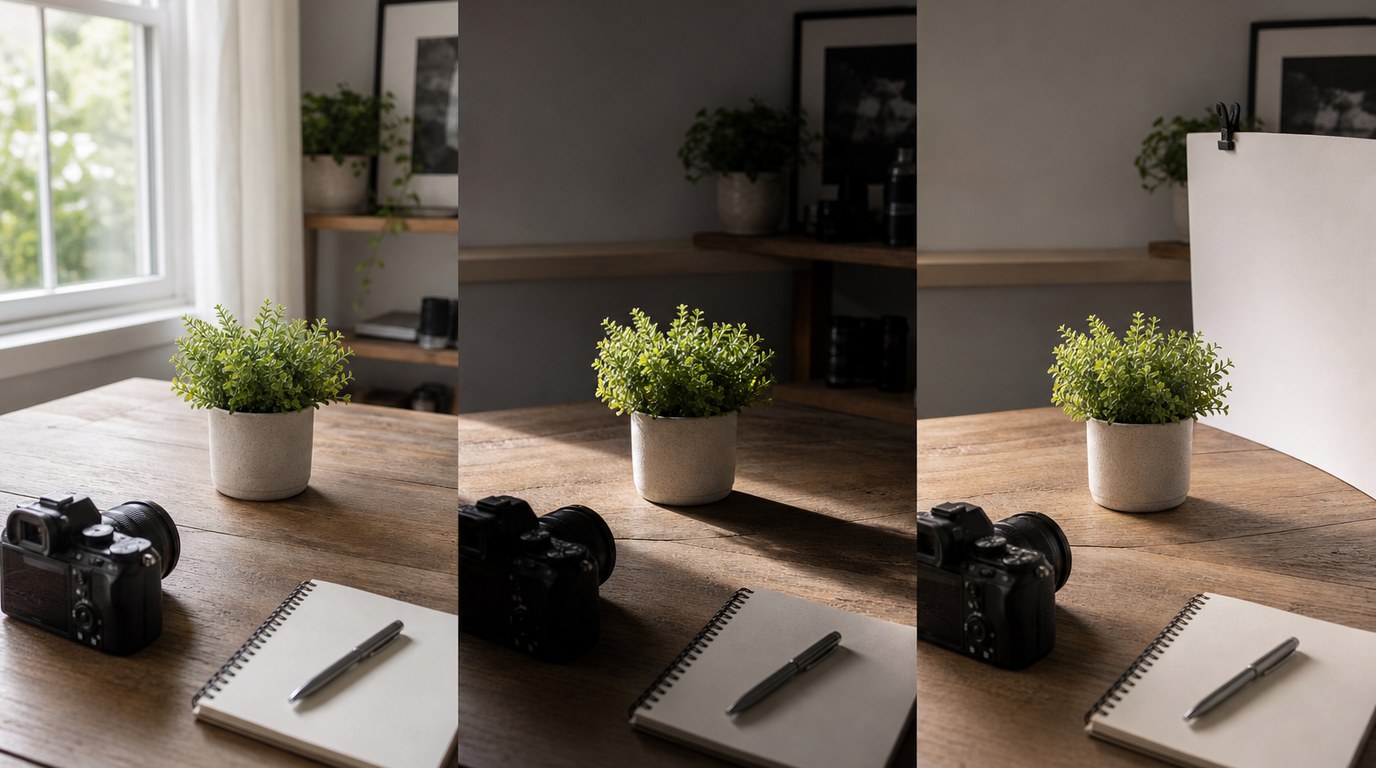
Spend one week on each lighting type. Photograph the same simple subject, such as a mug, plant, book, or friend, in different light.
For each session, make three frames: one safe version, one dramatic version, and one experiment. Write down where the light came from, whether it was hard or soft, and what you would change next time.
This practice trains your eye. Once you can recognize light quickly, camera settings become easier because you already know what kind of image you are trying to create.
FAQ
What Should a Beginner Know First About 9 Lighting Types to Harness Improve Your Photography?
Start by learning to see direction, softness, color, and contrast. Those four traits matter more than memorizing names. Once you can identify where the light comes from and how it affects shadows, each lighting type becomes easier to use intentionally.
What Matters Most When Evaluating 9 Lighting Types to Harness Improve Your Photography?
The most important question is whether the light supports your subject. Soft light may flatter a portrait, while hard side light may suit texture or drama. Judge lighting by mood, shadow detail, color, and how clearly it shapes the subject.
What Mistakes Should Readers Avoid with 9 Lighting Types to Harness Improve Your Photography?
Avoid assuming better gear will solve poor lighting. Also avoid harsh overhead light on faces, mixed color temperatures, blown-out highlights, and flat front light when depth matters. Most problems improve when you move the subject, change angle, or soften the light.
What Is the Next Logical Step After Learning About 9 Lighting Types to Harness Improve Your Photography?
Practice one lighting type at a time with the same subject. Compare the results side by side and note what changed. After that, start combining ideas, such as soft side light, golden hour backlight, or artificial light with natural fill.