The best photography tips for DSLR users are not about memorizing every menu item. Start by understanding how aperture, shutter speed, and ISO work together, then practice choosing focus, reading light, and composing with a clear subject. A DSLR gives you more control than a phone, but that control only helps when you make simple decisions on purpose.
For beginners, the fastest improvement usually comes from three habits: use a semi-automatic mode instead of full Auto, keep shutter speed fast enough to avoid blur, and check your photos as you shoot. Once those feel natural, you can refine depth of field, lens choice, RAW editing, and composition.
| Situation | Good Starting Mode | Useful Starting Point |
|---|---|---|
| — | —: | — |
| Portrait | Aperture Priority | f/2.8–f/5.6, single focus point |
| Landscape | Aperture Priority | f/8–f/11, low ISO |
| Moving subject | Shutter Priority | 1/500 sec or faster |
| Low light handheld | Aperture Priority or Manual | Wider aperture, higher ISO |
| Everyday practice | Program or Aperture Priority | Watch shutter speed and focus |
Start with the Exposure Triangle
The exposure triangle is the basic mental model behind DSLR photography. Aperture, shutter speed, and ISO all affect brightness, but each also changes the look of the photo.
Aperture controls how much light passes through the lens. A wide aperture such as f/1.8 or f/2.8 lets in more light and can blur the background. A narrower aperture such as f/8 or f/11 lets in less light but keeps more of the scene sharp.
Shutter speed controls how long the sensor is exposed to light. Fast speeds freeze motion. Slow speeds allow more light but can create blur.
ISO controls how sensitive the camera is to light. Higher ISO helps in dim conditions, but it can add noise.
Instead of thinking of settings separately, think in tradeoffs. If you choose a faster shutter speed for action, you may need a wider aperture or higher ISO to keep the image bright.
Use the Right Shooting Mode for the Situation
You do not need to jump straight from Auto to Manual. Many DSLR users learn faster with semi-automatic modes.
Aperture Priority mode, often marked A or Av, lets you choose the aperture while the camera selects shutter speed. It is excellent for portraits, landscapes, and general photography. Shutter Priority mode, often S or Tv, lets you choose shutter speed while the camera handles aperture. Use it for sports, pets, kids, or anything moving.
Program mode gives the camera more control but still lets you adjust important settings such as ISO, exposure compensation, and white balance. Manual mode is useful when light is consistent, but it is not required for every good photo.
Learn to Focus Deliberately
Soft photos often come from poor focusing, not a bad camera. Instead of letting the DSLR choose any focus point, select a single focus point or a small focus area. Place it over the most important part of the subject.
For portraits, focus on the eye closest to the camera. For still subjects, use single-shot autofocus, usually called AF-S or One Shot. For moving subjects, use continuous autofocus, often called AF-C or AI Servo, so the camera keeps adjusting focus as the subject moves.
Also pay attention to focus-and-recompose. If you focus, then move the camera a lot before taking the shot, focus may shift, especially at wide apertures. When possible, move the focus point instead.
Watch Your Shutter Speed to Avoid Blur
One of the most common DSLR mistakes is using a shutter speed that is too slow. The photo may look fine on the camera screen but appear blurry on a computer.
For handheld shooting, a common rule is to use a shutter speed at least as fast as the lens focal length. With a 50mm lens, try 1/50 sec or faster. With a 200mm lens, aim for 1/200 sec or faster. If your subject is moving, go faster.
For walking people, start around 1/250 sec. For running, sports, or active pets, try 1/500 sec or faster. If the image is too dark, raise ISO or use a wider aperture.
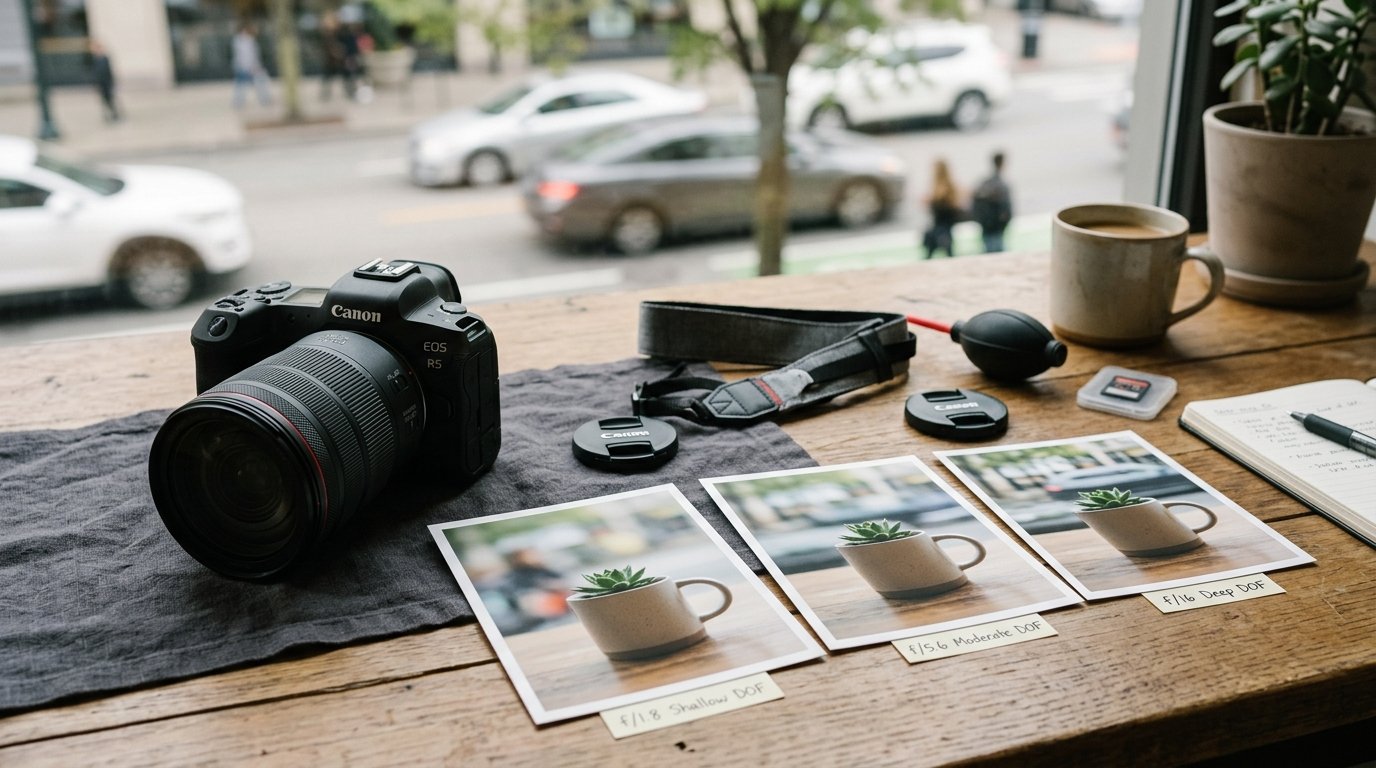
Control Depth of Field with Aperture
Depth of field means how much of the photo appears acceptably sharp from front to back. Aperture is one of the main ways to control it.
Use a wide aperture, such as f/1.8, f/2.8, or f/4, when you want your subject sharp and the background blurred. This works well for portraits, flowers, food, and detail shots.
Use a narrower aperture, such as f/8 or f/11, when you want more of the scene sharp. This is helpful for landscapes, architecture, and group photos.
Remember that aperture is not the only factor. Distance matters too. The closer you are to your subject, the blurrier the background can become.
Use Iso Without Fear, but Know the Tradeoff
Many beginners keep ISO too low because they fear noise. That can backfire. A noisy sharp photo is usually better than a clean blurry one.
Use low ISO, such as ISO 100 or 200, in bright light. In shade, indoors, or at sunset, raise it as needed. Modern DSLRs can often handle ISO 800, 1600, or higher better than beginners expect.
The tradeoff is image noise, which appears as grain or speckled color. Still, noise can often be reduced in editing. Motion blur and missed focus are much harder to fix.
Pay Attention to Light Before Settings
Good light can improve a photo more than any advanced camera setting. Before changing menus, look at the direction, softness, and color of the light.
Soft light is usually flattering. You can find it on cloudy days, in open shade, or near a window. Harsh midday sun creates strong shadows and bright highlights, which can be difficult for beginners. If you must shoot in harsh light, turn your subject so the light is not causing squinting or deep shadows under the eyes.
Backlight can look beautiful, especially near sunrise or sunset, but your subject may become too dark. Use exposure compensation, move your angle, or place the subject where light reflects back onto them.
Train yourself to ask, “Where is the light coming from?” before asking, “What setting should I use?”
Compose with a Clear Subject
A technically sharp photo can still feel weak if the viewer does not know where to look. Strong composition starts with a clear subject.
Before pressing the shutter, decide what the photo is about. Then remove distractions where possible. Move your feet, change your angle, zoom in, or wait for a cleaner background. Simple changes often help more than heavy editing later.
Use the rule of thirds as a starting point, not a law. Placing the subject slightly off-center can create balance, but centered compositions can also work well when the scene is symmetrical or direct.
Watch the edges of the frame. Beginners often miss bright objects, cut-off hands, tilted horizons, or clutter behind the subject.
Choose the Right Lens for the Photo You Want
Your lens affects angle of view, background blur, working distance, and sharpness. You do not need many lenses, but you should understand what each one does.
A kit zoom, such as an 18-55mm lens, is useful for learning because it covers wide and normal views. A 50mm prime lens is popular for portraits, low light, and blurred backgrounds. A telephoto zoom helps with sports, wildlife, and distant subjects.
Instead of buying a lens immediately, notice what limits you. Do you need wider views, more reach, better low-light ability, or smoother background blur? Let your actual shooting needs guide lens choices.
Shoot in Raw When You Want More Editing Flexibility
JPEG files are processed by the camera and are easy to share. RAW files keep more image information, which gives you more flexibility when editing exposure, white balance, shadows, and highlights.
Use RAW for important photos, difficult lighting, portraits, landscapes, or anything you plan to edit carefully. Use JPEG when you need smaller files, faster sharing, or minimal editing.
RAW files require editing software and more storage space, so they are not always necessary. Many DSLRs can shoot RAW+JPEG, which is a practical way to learn while keeping easy-to-use copies.
Review Your Photos and Adjust While You Shoot
Do not wait until you get home to discover mistakes. Build a quick review habit while you are still at the scene.
After a few shots, check sharpness by zooming in on the camera screen. Make sure the important part of the subject is in focus. Check brightness, especially if the scene has bright skies or dark shadows. If your camera has a histogram, use it to spot clipped highlights or overly dark exposures.
Also review your composition. Look for distractions, awkward crops, or tilted horizons. Then adjust and shoot again. This simple feedback loop is one of the fastest ways to improve because you correct problems in real time.
Build Better Dslr Habits with Practice Exercises
Practice works best when it is focused. Try one skill at a time instead of changing everything at once.
Spend one session using only Aperture Priority. Photograph the same subject at f/2.8, f/5.6, and f/11 to see depth of field change. On another day, use Shutter Priority and photograph moving cars, pets, or people at different shutter speeds.
Practice selecting your own focus point until it feels automatic. Then do a light exercise: photograph the same subject in direct sun, open shade, window light, and golden-hour light. These small drills build instincts you can use in real situations.
FAQ
What Should a Beginner Know First About Photography Tips for Dslr Users?
Beginners should first understand that DSLR photography is about control. Learn how aperture, shutter speed, and ISO affect brightness and appearance. Then practice focus, light, and composition. You do not need perfect settings immediately; you need repeatable habits that help you improve each shoot.
What Matters Most When Evaluating Photography Tips for Dslr Users?
The best tips are practical, visible in your results, and easy to apply while shooting. Prioritize advice that helps you get sharper focus, better exposure, less blur, and stronger composition. Avoid tips that depend on expensive gear before teaching basic camera control.
What Mistakes Should Readers Avoid with Photography Tips for Dslr Users?
Avoid staying in full Auto forever, using shutter speeds that are too slow, ignoring focus points, and keeping ISO too low in dim light. Also avoid obsessing over settings while ignoring light and composition. A well-lit, intentional photo usually beats a technically complex one.
What Is the Next Logical Step After Learning About Photography Tips for Dslr Users?
The next step is structured practice. Choose one topic, such as aperture, shutter speed, or autofocus, and spend a session testing it. Review your photos closely, note what worked, and repeat. Once the basics feel natural, start learning simple editing and RAW workflow.