Aperture is the adjustable opening inside your camera lens that lets light reach the camera sensor. A wide aperture, such as f/1.8 or f/2.8, lets in more light and can create a blurry background. A narrow aperture, such as f/11 or f/16, lets in less light and keeps more of the scene sharp.
For beginners, the key idea is simple: aperture affects both brightness and depth of field. It is one of the three main exposure settings, along with shutter speed and ISO, but it is also one of the most creative controls in photography. Once you understand aperture, you can make better portraits, landscapes, travel photos, food shots, and everyday images with more control.
What Is Aperture?
Aperture is the opening inside a lens that changes size to control how much light enters the camera. A helpful mental model is to think of it like the pupil of your eye. In dim light, your pupil gets larger to let in more light. In bright light, it gets smaller to reduce the amount of light.
Camera lenses work in a similar way. When you choose an aperture setting, small blades inside the lens open wider or close down. A wider opening lets in more light. A smaller opening lets in less light.
Aperture also changes the look of your photo, especially how much of the image appears sharp from front to back. This is called depth of field. That means aperture is not only a brightness control; it is also a creative tool. If you want a portrait with a soft background, aperture matters. If you want a landscape sharp from foreground to horizon, aperture matters too.
How F-stops Work
Aperture is measured in f-stops, written as numbers like f/1.8, f/2.8, f/4, f/5.6, f/8, f/11, and f/16. The confusing part for beginners is that smaller f-stop numbers mean a wider aperture, while larger f-stop numbers mean a narrower aperture.
So, f/1.8 is a large opening. It lets in a lot of light and can create strong background blur. On the other hand, f/16 is a small opening. It lets in much less light and keeps more of the scene in focus.
A simple way to remember it: small number, big opening; big number, small opening.
Each full stop changes the amount of light by doubling or halving it. Moving from f/4 to f/2.8 lets in twice as much light. Moving from f/4 to f/5.6 lets in half as much light. You do not need to memorize every technical detail at first. Just understand the direction: lower f-number equals brighter exposure and shallower focus; higher f-number equals darker exposure and deeper focus.
Aperture and Exposure: How It Changes Brightness
Exposure means how bright or dark your photo is. Aperture affects exposure because it controls how much light passes through the lens. If your photo is too dark, choosing a wider aperture such as f/2.8 instead of f/5.6 can brighten it. If your photo is too bright, choosing a narrower aperture such as f/11 instead of f/5.6 can darken it.
Aperture works together with shutter speed and ISO. If you change aperture, your camera may need to adjust one of the other settings to keep the same brightness. For example, if you move from f/2.8 to f/8, much less light reaches the sensor. To compensate, the camera may use a slower shutter speed or higher ISO.
This matters in real situations. Indoors, f/1.8 or f/2.8 can help you shoot without pushing ISO too high. In bright sunlight, f/8 or f/11 may work well because there is plenty of light. Aperture is often your first creative choice, but it always has an exposure tradeoff.
Aperture and Depth of Field: How It Changes Background Blur
Depth of field is the area of your photo that appears acceptably sharp. A shallow depth of field means only a small part of the image is sharp, often with a blurred background. A deep depth of field means much more of the scene is sharp from front to back.
Wide apertures create shallower depth of field. For example, if you photograph a person at f/1.8, their eyes may be sharp while the background turns soft and blurry. This is why wide apertures are popular for portraits, pets, details, and low-light scenes.
Narrow apertures create deeper depth of field. If you photograph a landscape at f/11, the foreground, middle distance, and background are more likely to appear sharp. This is useful when the whole scene matters.
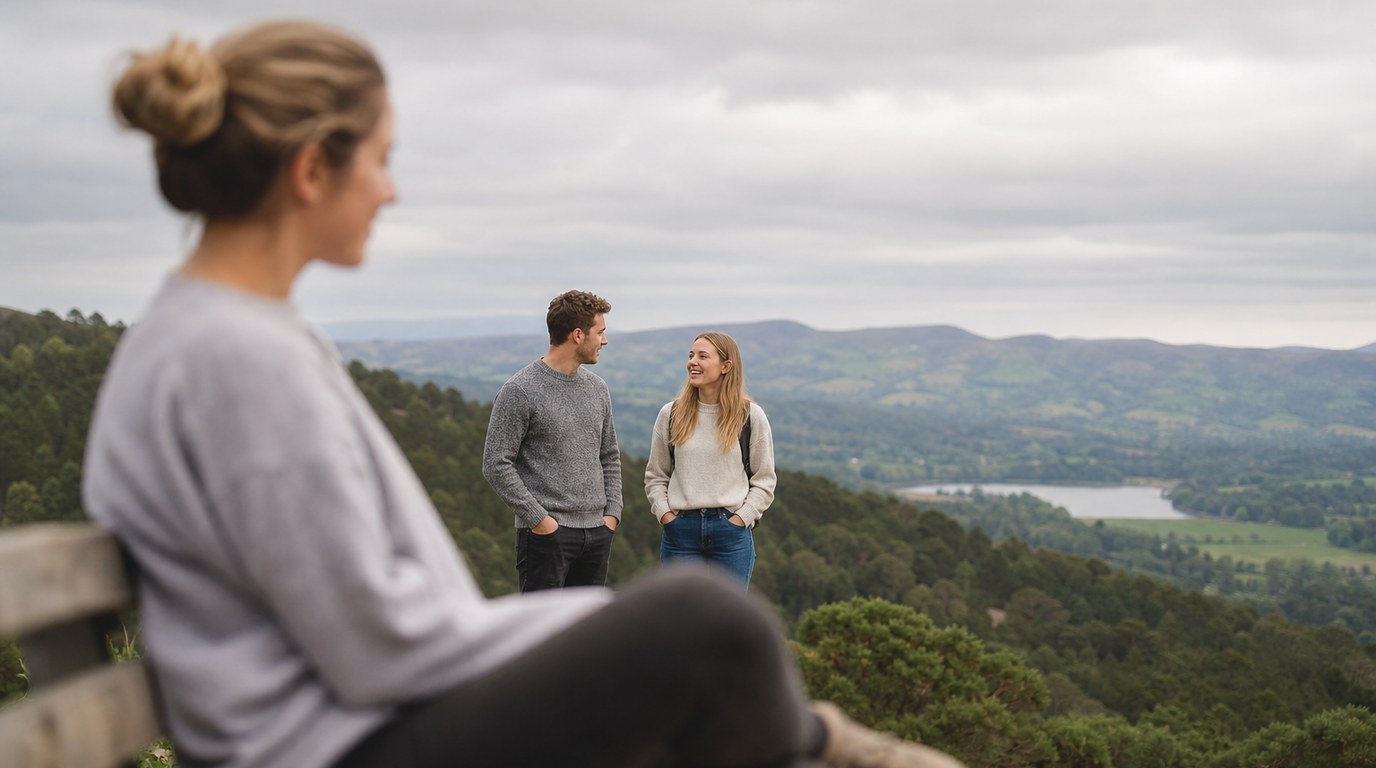
Aperture is important, but it is not the only factor. Background blur also depends on distance and lens choice. You get more blur when your subject is close to the camera and far from the background. A portrait at f/2.8 with the subject several feet in front of the background will usually look blurrier than the same portrait with the subject standing against a wall.
For beginners, start with this rule: use lower f-numbers when you want background blur, and higher f-numbers when you want more of the scene sharp.
Common Aperture Settings and When to Use Them
The best aperture depends on your subject, light, and creative goal. This table gives a practical starting point:
| Aperture | What It Does | Common Uses |
|---|---|---|
| f/1.8 | Very wide, lots of light, strong blur | Portraits, indoor photos, low light |
| f/2.8 | Wide, bright, soft background | Events, portraits, food, pets |
| f/4 | Moderate blur with more sharpness | Travel, casual portraits, details |
| f/5.6 | Balanced sharpness and light | Everyday photos, groups, street scenes |
| f/8 | Good overall sharpness | Landscapes, architecture, daylight |
| f/11 | Deep depth of field | Landscapes, cityscapes, product setups |
| f/16 | Very deep depth of field, less light | Bright scenes, sunstars, maximum depth |
These are not strict rules. Think of them as starting points. If you want more blur, open the aperture. If you need more in focus, stop down to a higher f-number.
How to Choose Aperture for Different Types of Photos
For portraits, start around f/1.8 to f/2.8 if you want a soft background. Be careful with very wide apertures, especially close up, because one eye may be sharp while the other is slightly soft. If you are photographing more than one person, try f/4 or f/5.6 to keep everyone sharper.
For landscapes, start at f/8 or f/11. These settings usually give a good balance of sharpness and depth of field. If you have a strong foreground close to the camera, f/11 or f/16 may help keep more of the scene sharp, but watch for slower shutter speeds.
For street and travel photography, f/5.6 to f/8 is often practical. These apertures give you enough depth of field for quick moments while still working well in daylight. If the light gets low, open up to f/2.8 or f/4.
For food, flowers, and details, try f/2.8 to f/4. This can isolate the subject while keeping enough of it sharp. If the item is small and close to the lens, depth of field becomes very thin, so f/5.6 may look better.
For groups, avoid using f/1.8 unless everyone is on the same plane. Start at f/5.6 for small groups and consider f/8 for larger groups, especially if people are standing in rows.
Aperture Priority Mode: the Easiest Way to Practice
Aperture Priority mode is one of the best ways to learn aperture. On many cameras it is marked as A or Av. In this mode, you choose the aperture, and the camera automatically chooses a shutter speed to match the exposure.
This lets you focus on the creative effect without going fully manual. Set f/2.8 and notice how the background looks. Then switch to f/8 and compare the difference. The camera handles much of the brightness adjustment, so you can pay attention to depth of field.
Still, watch your shutter speed. If it becomes too slow, your photo may blur from camera shake or subject movement. In that case, use a wider aperture, raise ISO, or add more light.
Common Aperture Mistakes Beginners Make
One common mistake is thinking the lowest f-number is always best. While f/1.8 can look beautiful, it can also make focus difficult. For close portraits, you may miss focus on the eyes. For groups, some people may be blurry.
Another mistake is using very narrow apertures all the time for “maximum sharpness.” Settings like f/16 can give more depth of field, but they also reduce light. That may force a slower shutter speed or higher ISO. Many lenses are also very sharp around f/5.6 to f/8, so you do not always need to stop down heavily.
Beginners also forget that aperture affects both exposure and background blur at the same time. If you change from f/2.8 to f/11, the photo will get darker unless the camera or you adjust another setting.
Finally, many people ignore distance. If you want a blurrier background, do not rely only on aperture. Move closer to your subject and place the subject farther from the background.
Simple Aperture Practice Exercise
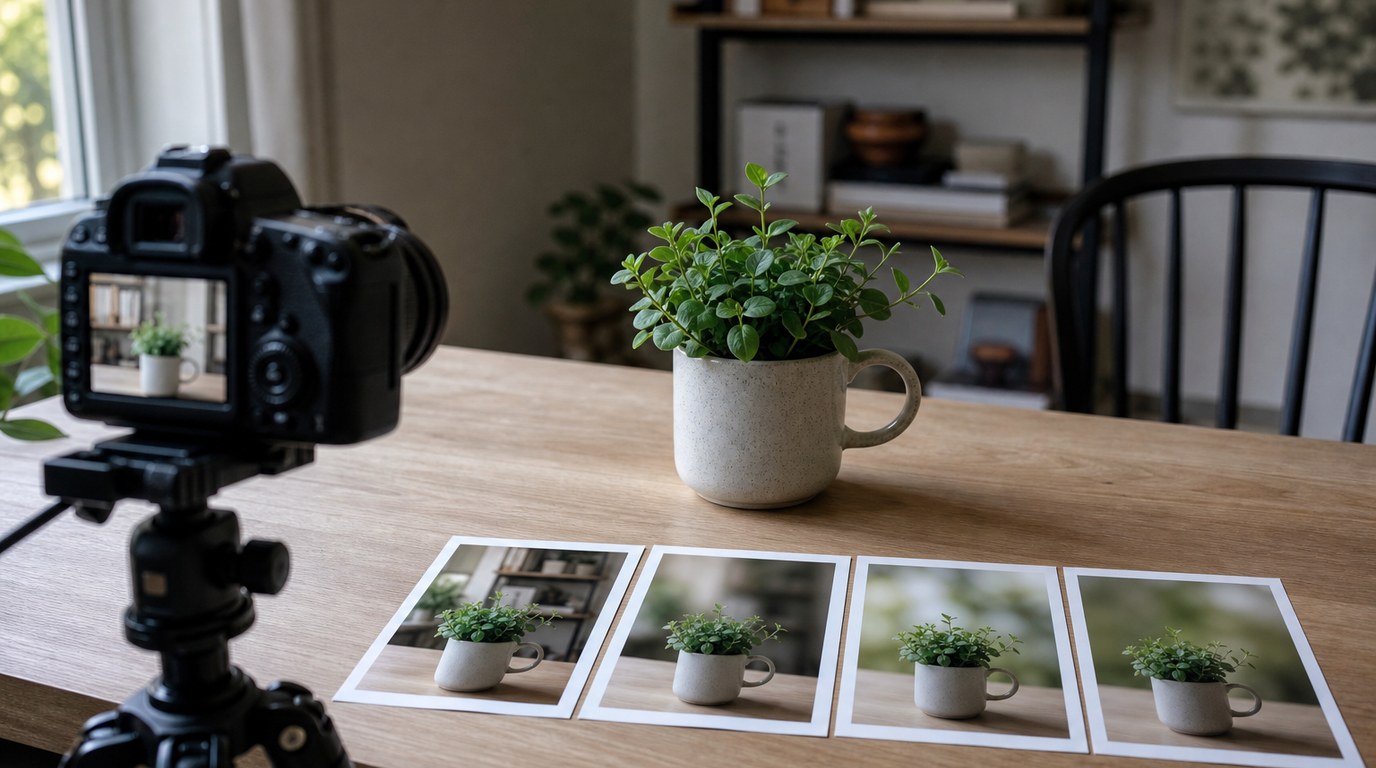
Choose one subject, such as a mug, plant, or person. Place it a few feet in front of a background. Use Aperture Priority mode and take the same photo at f/1.8 or f/2.8, then f/4, f/8, and f/16.
Keep your focus point on the same part of the subject each time. Afterward, compare the photos on a larger screen. Look at two things: how the brightness changed and how the background blur changed. This simple exercise makes aperture much easier to understand than reading alone.
FAQ
What Should a Beginner Know First About Guide to Aperture?
A beginner should first know that aperture is the lens opening that controls light and depth of field. Lower f-numbers like f/1.8 mean a wider opening and more blur. Higher f-numbers like f/11 mean a smaller opening and more of the scene in focus.
What Matters Most When Evaluating Guide to Aperture?
The most important thing is understanding the tradeoff. Aperture changes brightness, but it also changes how much of the image is sharp. A good aperture choice depends on your subject, available light, and whether you want background blur or front-to-back detail.
What Mistakes Should Readers Avoid with Guide to Aperture?
Avoid using the widest aperture for every photo. It can make focusing harder and leave important details soft. Also avoid using f/16 all the time, because it cuts light dramatically. Choose aperture based on the photo you want, not just habit.
What Is the Next Logical Step After Learning About Guide to Aperture?
The next step is to practice in Aperture Priority mode. Photograph the same subject at several f-stops and compare the results. After that, learn how shutter speed and ISO work with aperture so you can control exposure more confidently.